¶ Introduction
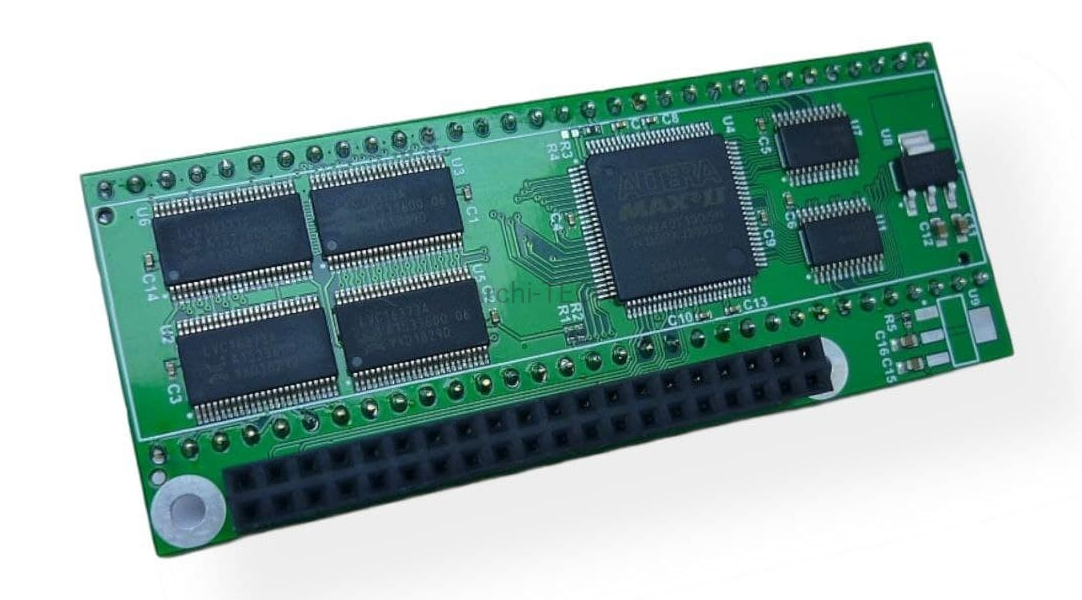
The PiStorm itself is an adapter board intended to be paired with a Raspberry Pi Model 3A+. It goes in the DIP socket on and acts in place of the CPU, but functionality can be extended beyond simple CPU emulation.
While the PiStorm should work with any DIP socket 16-bit 68000-powered system, the FC lines are currently not properly handled and no guarantees can be made for it working on anything except an Amiga 500, 500+, 1000 and 2000. It does work to some extend in a CDTV, but the lack of bus arbitration signal handling in the CPLD firmware will mean that the CD-ROM drive either does not work at all, or only works sporadically when the timing stars align.
General Performance with the current use of Musashi as the 68k CPU emulator is somewhere around a 100-125MHz 68030.
The intended Raspberry Pi model to use with the PiStorm is Model 3A+. 3B+ works, but due to component clearance issues it will not fit unless the Pi itself is modified (USB ports replaced) or a GPIO spacer/relocator is installed.
¶ Amiga-specific functionality
Since much of the initial work and testing for the PiStorm was done on Amiga computers, a number of extended features are available when the PiStorm is paired with for instance an Amiga 500:
| Kickstart ROM mapping | 1.3, 2.0, 3.1, anything you might own and have dumped in a byteswapped format. Extended ROM mapping as well for instance with the CDTV extended BIOS. An A1200 3.1+ Kickstart ROM is currently recommended, as this one has the most dynamic automatic configuration on boot. |
| Fast RAM | Z2, Z3 and CPU local Fast can be mapped for high performance memory available to the CPU only on the PiStorm side of things. |
| Virtual SCSI | PiSCSI, a high performance virtual SCSI interface for mapping raw RDB disk images or physical storage devices connected to the Pi for use on the Amiga. |
| RTG | PiGFX, a virtual RTG board with almost all P96-supported functionality supported and accelerated. |
| Some other things | Most likely I forgot something while writing this, but someone will probably tell me about it |
¶ Simple quickstart
Download Raspberry Pi OS from https://www.raspberrypi.org/software/operating-systems/, the Lite version is recommended as the windowing system of the Full version adds a lot of extra system load which may impact performance.
- Write the Image to a SD Card. 8GB is plenty for the PiStorm binaries and required libraries, but if you wish to use
large hard drive images or sometthing with it, go with a bigger card. - Install the PiStorm adapter in place of the orignal CPU in the system, for instance an Amiga 500. Make sure
the PiStorm sits flush and correct in the socket. When installed in an Amiga 500, The correct orientation
on the PiStorm is with the USB port facing toward you and the HDMI port facing to the right. If the PiStorm
does not stay in place properly (popping out of the CPU socket) then bend the pins of the PiStorm very
very very slightly outwards. Double check that all is properly in place and no pins are bent. - Connect an HDMI Display and a USB keyboard to the PiStorm. Using a USB Hub is possible, an externally powered hub is recommended. Connect the Amiga to the PSU and PAL Monitor
- Insert the SD into the Raspberry Pi, Power on the Amiga now. You should see a Rainbow colored screen on the HDMI Monitor and the PiStorm booting.
- When the boot process is finished (on the first run it reboots automatically after resizing the filesystems to your SD) you should be greeted with the login prompt.
- Log in as the default user, typically user:
piand password:raspberry. (The keyboard is set to US Layout on first boot!) - Run
sudo raspi-config - Set up your preferences like keyboard layout, language, etc. It is recommended to set the screen resolution to 1280x720.
- Set up your Wi-Fi credentials
- Enable SSH at boot time
- Exit raspi-config
- You can now reach the PiStorm over SSH, check your router web/settings page to find the IP of the PiStorm, or run
ifconfiglocally on the PiStorm from the console. - Now the final steps to get things up and running, all of this is done from a command prompt (terminal) either locally on the PiStorm or over ssh:
sudo apt-get updatesudo apt full-upgrade(If you get mysterious 'not found' messages from running the line in the next step.)sudo apt-get install git libasound2-devgit clone https://github.com/captain-amygdala/pistorm.gitcd pistormmake
14. Next up, follow the steps for installing the FPGA bitstream update below. (Scroll down.)
15. If you are running the PiStorm in an Amiga computer, you can start the emulator with a basic default Amiga config by typing sudo ./emulator --config amiga.cfg.
In addition, the emulator will attempt to load a file called default.cfg if no config file is specified on the command line, so if you wish for the emulator to start up with for instance the basic default Amiga config, you can copy amiga.cfg to default.cfg.
Important note: Try not to edit the sample config files such as amiga.cfg, always save them under a different name, for instance one directory level below the pistorm directory.
One way to do this would be to copy for instance amiga.cfg like this: cp ./amiga.cfg ../amiga.cfg and then running the emulator using
sudo ./emulator --config ../amiga.cfg. This way, you will never have any problems using git pull to update your PiStorm repo to the latest commit.
16. To exit the emulator you can press Ctrl+C (on the keyboard or over SSH) or press Q on the keyboard connected to the Raspberry Pi.
17. For Amiga, there is currently no Gayle or IDE controller emulation available, but PiSCSI can now autoboot RDB/RDSK hard drive images (and physical drives), with Kickstart 2.0 and up. Check out the readme in platforms/amiga/piscsi for more detailed information.
¶ FPGA bitstream update :
Install OpenOCD: sudo apt-get install openocd
Run the FPGA update with ./flash.sh, this will automatically detect your CPLD version and flash appropriately. If successful "Flashing successful!" will appear, if not it will fail with "Flashing failed" and nprog_log.txt will be created with more details.